

Histopathology is the cornerstone of diagnostic pathology, offering microscopic insight into disease processes. For postgraduate students stepping into this intricate world, mastering the foundational techniques is essential—not just for exams, but for clinical relevance and research applications.
This post walks through the essential steps of tissue processing, embedding, sectioning, and staining, with practical tips and troubleshooting insights presented by Dr. Kusuma Prakash Aras.
🔍 Tissue Processing: From Biopsy to Slide
The journey begins with fixation, where tissue integrity is preserved using agents like 10% neutral buffered formalin (NBF). Key factors—penetration depth, temperature, and duration—determine the quality of fixation.
Processing steps include:
- Fixation – Stabilizes tissue morphology.
- Dehydration – Removes water using graded alcohols.
- Clearing – Replaces alcohol with agents like xylene.
- Impregnation – Infiltrates tissue with paraffin wax.
- Embedding – Solidifies tissue in molds for sectioning.
- Sectioning – Produces thin slices using microtomes.
- Staining – Highlights cellular components.
- Mounting – Preserves the stained section for microscopy.
🔬 Fixation: The First and Most Crucial Step
Fixation preserves tissue architecture by halting autolysis and putrefaction. It stabilizes proteins and cellular components, ensuring they withstand processing and staining.
🧪 Types of Fixatives
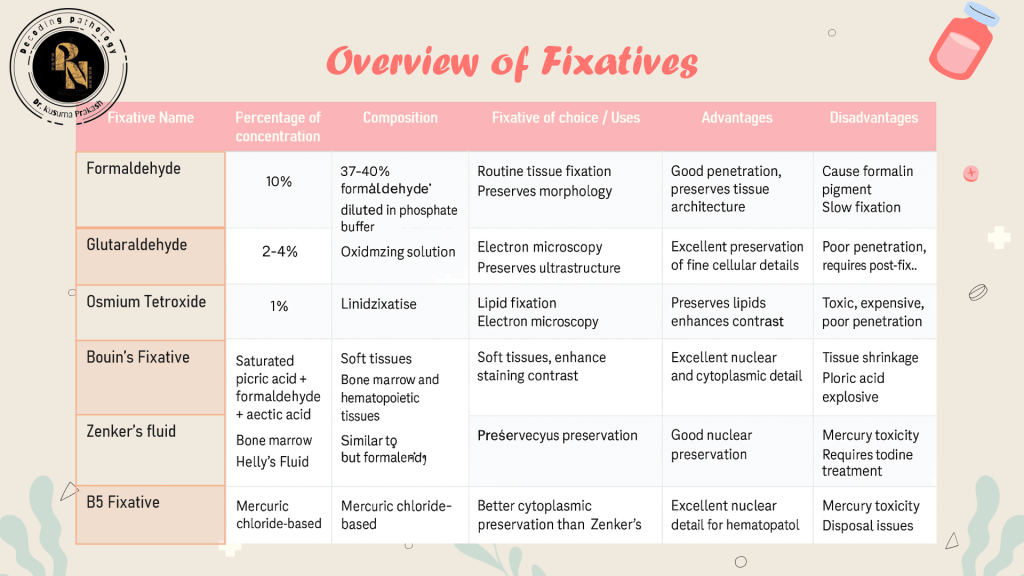

Fixatives are classified based on their chemical nature and intended use:
🧠 Clinical Insight: Formalin is ideal for routine histology, but glutaraldehyde offers superior ultrastructural preservation for electron microscopy.
⏱️ Fixation Time Guidelines
| Tissue Type | Fixative | Time |
|---|---|---|
| Small biopsies | 10% NBF | 6 hrs |
| Large specimens | 10% NBF | 12–24 hrs |
| Lymph node | B5 solution | 18 hrs |
| Bone marrow | Bouin’s fluid | 3 hrs |
| Eye | 10% NBF | 48 hrs |
🧪 Tissue Processing Methods: Manual, Automated & Microwave
Tissue processing transforms fixed specimens into paraffin-embedded blocks ready for sectioning. The goal is to replace water with a support medium—typically paraffin wax—without compromising tissue integrity.
🔧 Manual Tissue Processing
This traditional method involves manually transferring tissues through reagents in a stepwise fashion. Though labor-intensive, it allows flexibility for delicate or rare specimens.
🤖 Automated Tissue Processing
Modern processors streamline workflow and improve consistency. Two main types exist:
| Processor Type | Mechanism | Best For |
|---|---|---|
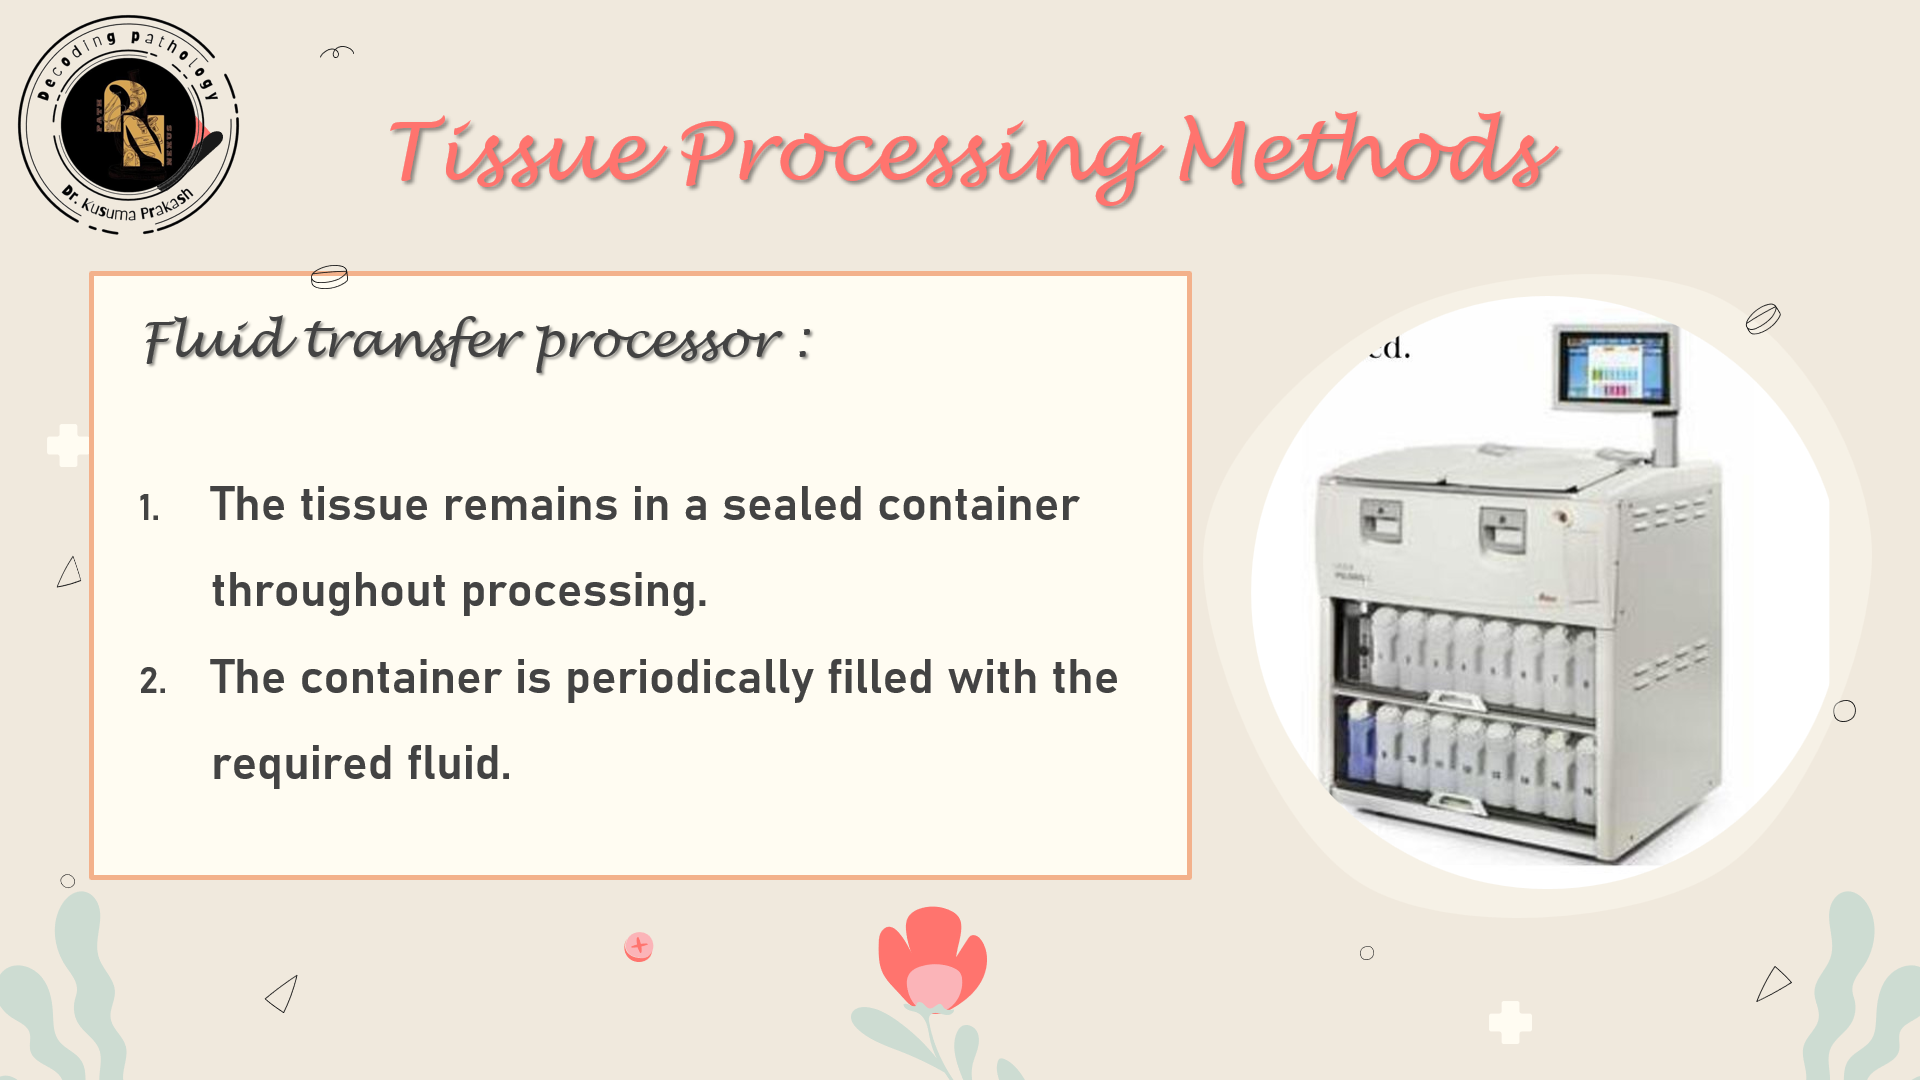
| Tissue-transfer (Dip & Dunk) | Basket moves between reagent containers | Small labs |
| Fluid-transfer (Enclosed) | Reagents pumped in/out of a chamber | High-throughput labs |

Enhancements:
- Agitation – Improves reagent penetration
- Heat – Speeds up diffusion (≤45°C)
- Vacuum/Pressure – Removes trapped air, accelerates infiltration
🧠 Clinical Insight: Vacuum cycles are especially useful for fatty or porous tissues like breast or placenta.
💧 Dehydration: Preparing for Embedding
Water must be removed before embedding, as paraffin wax is immiscible with water. Dehydration is done gradually to prevent tissue distortion.
🔄 Common Dehydrants
- Ethanol – Most widely used; gentle on tissues
- Isopropanol – Similar to ethanol; less expensive
- Methanol – Harsh; used selectively
- Acetone – Rapid dehydration; ideal for fatty tissues
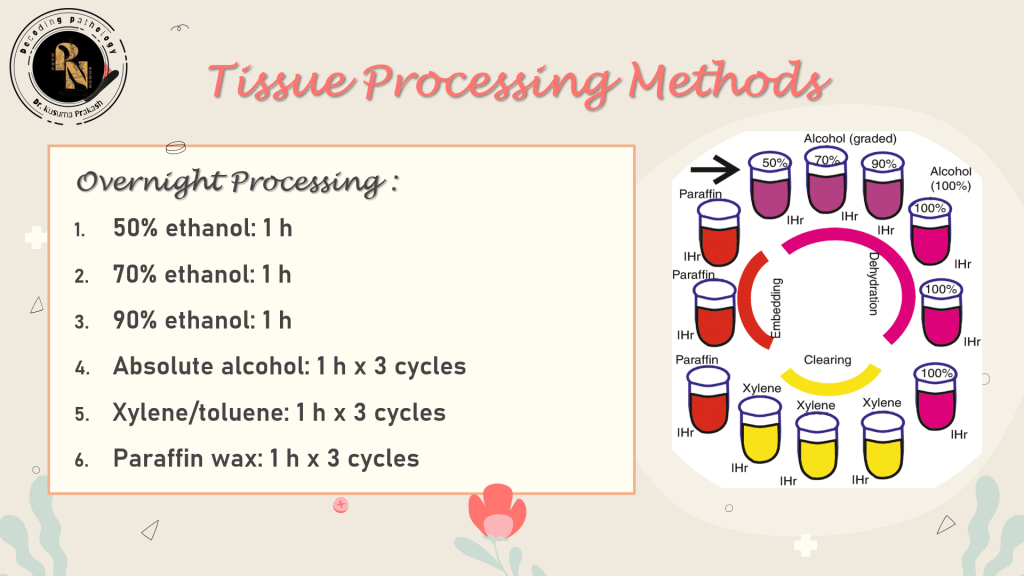
📊 Dehydration Protocol
| Alcohol Concentration | Duration |
|---|---|
| 70% → 90% → 100% | 1 hr each (small tissue) |
| 100% (absolute) | 2–3 cycles for complete dehydration |
🧪 Tip: Use anhydrous copper sulfate to test water content in alcohol—blue color indicates moisture.
🌫️ Clearing: Transition to Embedding
Clearing replaces alcohol with a medium compatible with wax. It renders tissue translucent and prepares it for impregnation.
🔍 Clearing Agents
| Agent | Properties | Notes |
|---|---|---|
| Xylene | Rapid, miscible with wax | Common but toxic |
| Chloroform | Slower, less brittle | Used in delicate tissues |
| Cedarwood oil | Gentle, slow | Ideal for eyes, brain |
| Dioxane | Dual role (dehydrant + clearant) | Useful in special protocols |
🧠 Workflow Tip: Ensure clearing agents are fresh and not saturated with alcohol to avoid incomplete clearing.
🕯️ Impregnation & Embedding: Solidifying the Structure
Impregnation introduces paraffin wax into cleared tissue. Embedding then molds the tissue into blocks for sectioning.
🧊 Paraffin Wax
- Melting point: 56–62°C
- Additives:
- Stearic acid (hardness)
- Ceresin (adhesion)
- DMSO (reduces infiltration time)
🧱 Embedding Media Alternatives
| Medium | Best suited for |
|---|---|
| Epoxy resin | Electron microscopy |
| Methacrylate | Hard tissues |
| Agar gel | Friable tissues |
| Gelatin | Frozen sections |
🧠 Orientation Tip: Always align epithelial surfaces and long tissues diagonally for optimal sectioning.
✂️ Sectioning: Precision with Microtomes
Microtomes slice embedded tissue into thin sections. Rotary microtomes are preferred for routine histology.
🔧 Types of Microtomes
- Rotary – High precision, automated
- Rocking – Simple, low-cost
- Sledge – Thick sections, hard tissues
- Sliding – Brain and celloidin blocks
- Cryo – Frozen sections
- Ultramicrotome – EM (40–100 nm)
- Laser – Non-contact, advanced


🧠 Technique Tip: Maintain a clearance angle of 2–5° and use smooth strokes to produce ribbon-like sections.
🎨 Staining: Revealing the Microscopic World
Staining imparts contrast to tissue components. H&E remains the gold standard.
🧪 Dye Classification
| Type | Charge | Target | Example |
|---|---|---|---|
| Acidic | Negative | Cytoplasm | Eosin |
| Basic | Positive | Nucleus | Methyl green |
| Neutral | Both | Nucleus + cytoplasm | Giemsa |
| Chelating | Weak acid | Nucleus | Harris hematoxylin |
🧠 Advanced Note: Iron hematoxylin enhances nuclear detail, especially in neurohistology.
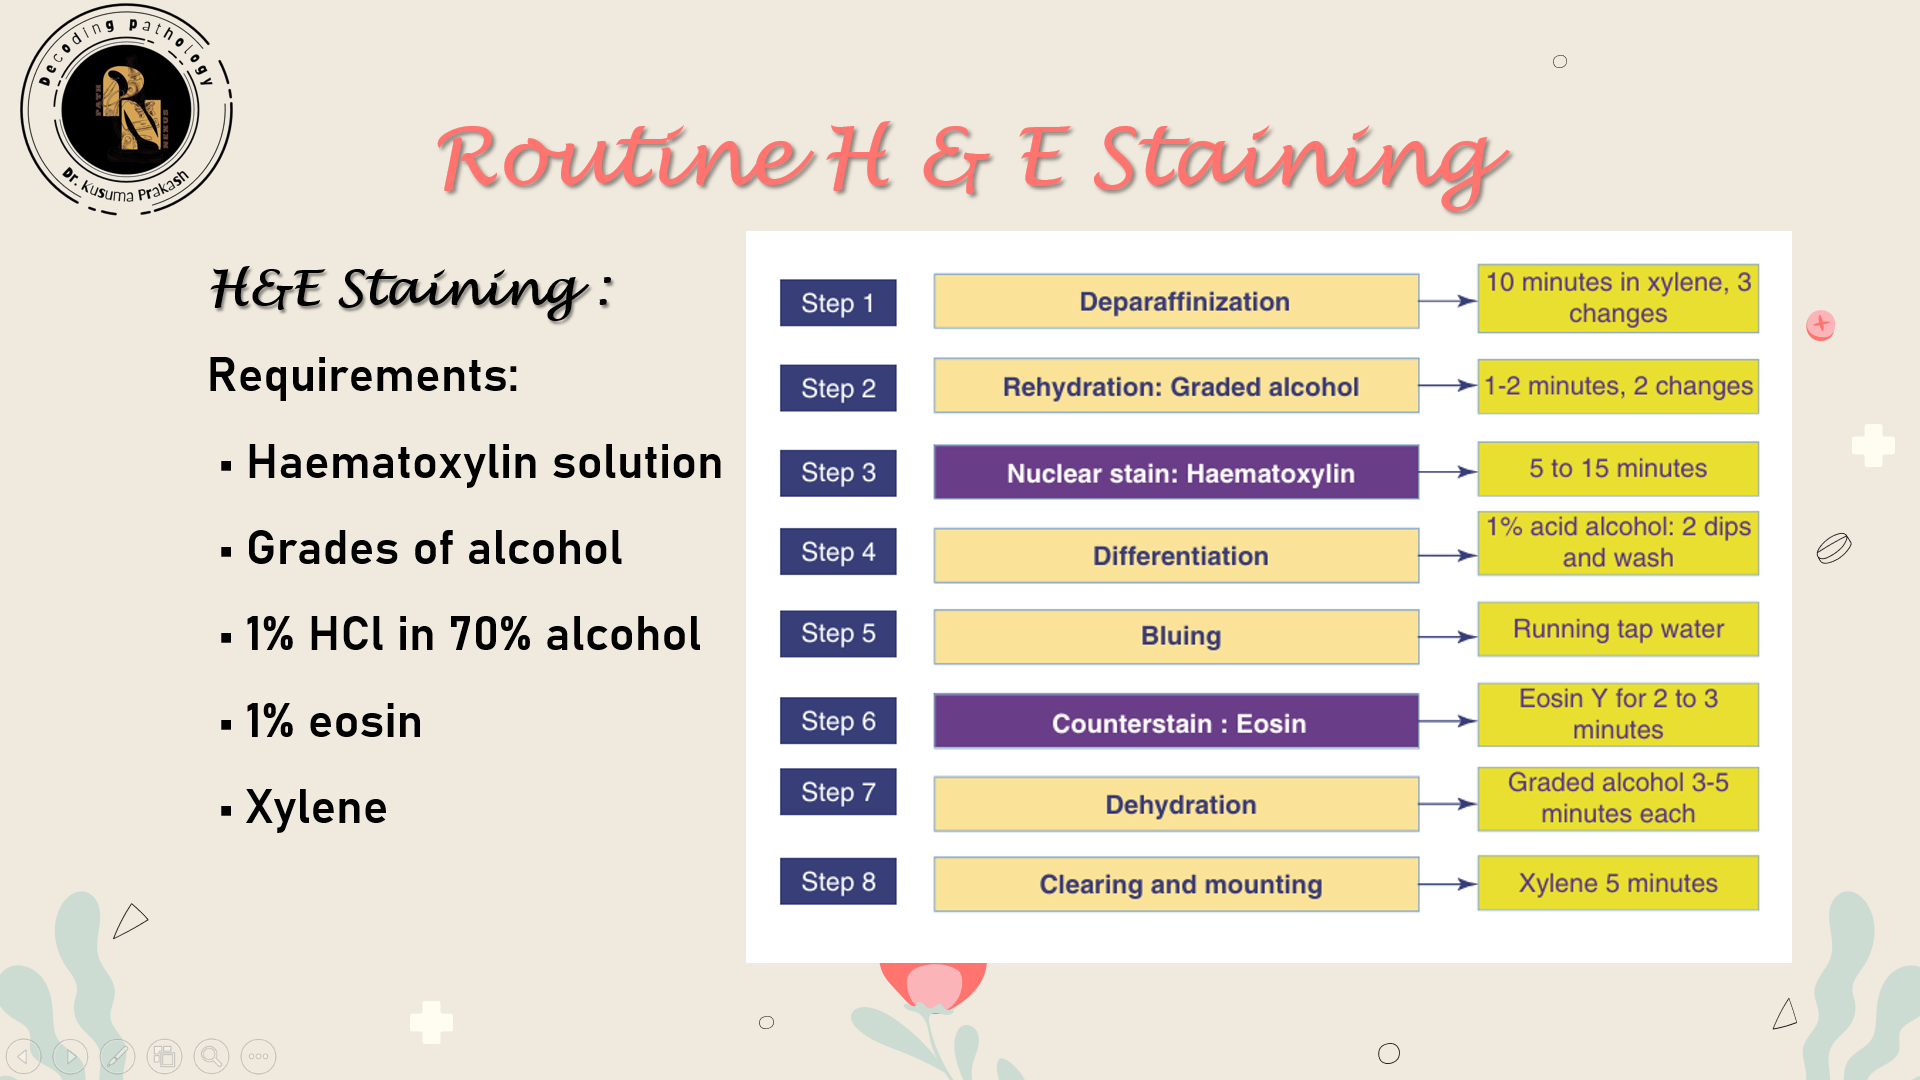
🎨 H&E Staining Protocol: Step-by-Step Breakdown
Hematoxylin and Eosin (H&E) staining is the most widely used technique in histopathology. It provides contrast between nuclear and cytoplasmic components, allowing for detailed morphological assessment.
🧪 Reagents Required
- Hematoxylin solution (e.g., Harris or Mayer’s)
- Eosin Y solution (1% in alcohol)
- Graded alcohols (100%, 95%, 70%)
- Xylene
- 1% HCl in 70% alcohol (for differentiation)
- Ammonia water or Scott’s tap water substitute (for bluing)
- DPX or Canada balsam (mounting medium)
🧬 Step-by-Step Procedure

| Step | Purpose | Details |
|---|---|---|
| 1. Deparaffinization | Remove wax | Immerse slides in xylene (2–3 changes, 5 min each) |
| 2. Rehydration | Prepare tissue for staining | Pass through descending alcohol grades (100% → 70%) then rinse in water |
| 3. Hematoxylin staining | Stain nuclei | Dip in hematoxylin for 5–10 min depending on formulation |
| 4. Rinsing | Remove excess dye | Wash in running tap water for 5 min |
| 5. Differentiation | Sharpen nuclear detail | Dip in 1% acid alcohol for 2–5 sec |
| 6. Bluing | Convert hematoxylin to blue-purple | Dip in ammonia water or Scott’s solution for 1–2 min |
| 7. Eosin staining | Stain cytoplasm and connective tissue | Immerse in eosin for 1–2 min |
| 8. Dehydration | Remove water | Pass through ascending alcohol grades (70% → 100%) |
| 9. Clearing | Prepare for mounting | Immerse in xylene (2 changes, 2–3 min each) |
| 10. Mounting | Preserve stained section | Apply DPX and coverslip carefully |
🧠 Interpretation Guide
| Component | Color |
|---|---|
| Nuclei | Blue to purple |
| Cytoplasm | Pink |
| Muscle fibers | Deep red |
| RBCs | Orange-red |
| Calcium deposits | Dark blue |
| Mucin | Grey-blue |
⚠️ Troubleshooting Tips
| Issue | Cause | Solution |
|---|---|---|
| Pale nuclei | Under staining or over-differentiation | Increase hematoxylin time or reduce acid alcohol exposure |
| Smudged nuclei | Excess hematoxylin | Optimize differentiation step |
| Weak eosin staining | Short staining time or diluted eosin | Refresh eosin solution and extend staining time |
| Uneven staining | Incomplete dehydration | Ensure proper alcohol progression before staining |
🧴 Mounting: Final Preservation
Mounting seals the stained section under a coverslip using media with refractive index ~1.52.
🧪 Common Mountants
| Medium | Use | Pros | Cons |
|---|---|---|---|
| DPX | Permanent | Quick drying | Coverslip retraction |
| Canada balsam | Permanent | Good clarity | Yellowing over time |
| Glycerine-glycerol | Temporary | Safe, fast | Poor long-term stability |
| Polyvinyl alcohol | Temporary | Good for fat stains | Not permanent |
🛠️ Troubleshooting Tips
| Issue | Cause | Solution |
|---|---|---|
| Soft tissue | Incomplete dehydration | Adjust alcohol steps |
| Wrinkled sections | Static or poor clearing | Use ionizer, fresh xylene |
| Uneven staining | Suboptimal dehydration | Revise protocol |
| Brittle tissue | Excess blood | Warm gauze before sectioning |
📚 Final Thoughts
Histopathology is a meticulous craft. For postgraduate students, mastering each step—from fixation to mounting—builds the foundation for diagnostic precision and research excellence.

Leave a comment